Visit my Amazon Store

All links and articles in this Blog


Following is the list of all the links, articles and tutorials presented in this blog(from Newest to oldest):


And of course there are tabs above, that will take you to different links and covers other areas.

A Few Methods For Recovering Data...

When it comes to restoring the hard drive, you have the choice, consisting of several methods. In addition to periodic backups, you must take the following measures for data storage.
Every day there are new more sophisticated viruses, and system security should take the first place for any company and individual user. Malware can damage the operating system and the computer stops booting. The favorite aim for developers of malicious software are operating systems Windows, so it is recommended to use two or more anti-spyware/adware tools / antivirus programs. This will help prevent damage or theft of data.
Spyware scanner (spyware).
Actions of spyware software include:
- The emergence of different ads;
- Tracing the history of the Internet browser;
- Sudden change in the Internet home page;
- The emergence of a new toolbar or icons;
- Slow computer performance. Any computer with access to the Internet may encounter this problem. To protect against various types of malicious software, there are special programs.
Precautions:
Make sure that all employees who use a network of offices do not download any information from unknown sites. Install computer security browser on ‘medium’ level or above. Install a firewall on each computer. Purchase and install anti-spyware/adware tools program. Conduct a system scan for viruses at least once a week. In case of detection of spyware, remove it immediately from your computer.
Maintenance of your computer:
Make sure that the hard disk is not infected or damaged files. Companies such as Norton have developed special programs for disk optimization that can help you to optimize your system, correct problems with the files and remove unnecessary data from your hard drive. Conduct process optimization at least once a week.
Hard disk:
Recovering of hard drive. There are programs to recover lost data. Some of them specialize in restoring files have a certain format, such as graphic files or text documents, while others specialize in files of any type, regardless of their size. Of course, such programs cannot guarantee you a full recovery.
Programs for self-use are cheaper than services of companies for restoring the data. And before you call the expert of the company, you should at least try to restore your data using the recovery program.
In addition, there are programs to restore deleted files. These programs are used to recover information after formatting the hard disk after a system crash, after a sharp rise in tension, natural disaster, or viral infection.
You can also use the method of error recovery RAID, which is based on the fact that two or more hard drives working in parallel. This is a very complicated process. However, this is one of the most foolproof methods of data storage, because in this case fragments of a file distribute over the set of partitions storage. However, if you are going to use this method, it is best to seek professional help. Usually, when a firm receives data recovery hard drive, the first things they do is their viewing, then choose a method necessary for recovery. If a disk failure occurred because of the logical problems, as mentioned earlier, they will try to recover the data. In some cases, they can completely restore your hard drive.

Thanks for reading this. If you have any concerns, please email me at jack_store@rocketmail.com

Optimizing Windows XP

Windows XP has been the most popular operating system for personal computers for a long time.

XP Home is designed for home users who do not require complex corporate applications such as Web server, but they need an expanded and reliable operating system. If you use Windows XP, there are several tricks using which you can optimize its work.
Next, I will describe some of them. They are so important that should be included in any reference book on the work and effectiveness of WinXP. The first and most important thing you should do for the stable functioning of WinXP is to make sure that your computer is free from:
- Viruses;
- Trojans;
- Spyware and other parts of the software, which can cause a slowdown or failure of your operating system. To do this, especially if you have a broadband Internet connection, you must install a firewall.
The firewall controls the access point of software (ports) that use applications when interacting with your computer. Ports are just the numbers that came with your Internet protocol (or a different IP address), define a separate channel network transmission. Some ports should be open, such as port 80, which was created to provide HTTP communication. But others should be closed until they are nedded to this program. At the operating system WinXP whole range of ports is open by default.
I also recommend installing programs such as antivirus and anti-spyware. They can remove the malignant part of the programs, hindering the work of your system.
So, go further. Register WinXP is the centralized structure of these programs WinXP, it includes direct WinXP, is used to store configuration information. Directory can quickly overflow, leading to a slowdown functioning. This can happen especially if you delete unused programs improperly. This would lead to that deleted programs would remain in the roster a bunch of “garbage” records. And that, ultimately, lead to a slowing down of the system, because the programs appeal to it during their entire work. To clean the registry, there are different programs. I do not recommend contact with the registry carelessly: always create backup copy before its change.
Another useful tip: defragment your hard disk from time to time. WinXP can store a variety of program files in different places for increase the available memory of hard disk. But it will increase the time to access the file. Over time hard drive can accumulate many such fragmented files, which will lead to confusion and slow down the system. Fortunately, this can be solved easily with the utilities built-in to your system, which task is to defragment your hard drive. But keep in mind that this process could take several hours.
If you need to find a nice remove spyware infection or any helpful information about the topic of spyware blockers, please visit the hyperlinked web site.
And it is very important that you follow some general tips – today the web technologies give you a really unique chance to choose exactly what you require at the best terms which are available on the market. Strange, but most of the people don’t use this opportunity. In real life it means that you must use all the tools of today to get any information that you need.
Search Google or other search engines. Visit social networks and have a look on the accounts that are relevant to your topic. Go to the niche forums and join the discussion. All this will help you to build up a true vision of this market. Thus, giving you a real chance to make a smart and nicely balanced decision.

Microsoft Excel 2007 tips. How to create a standalone chart...

To create any chart in Microsoft Excel, you must begin by selecting the data that you want to plot including any headings. You then have the choice of creating either a stand-alone chart or an embedded chart. To create a stand-alone chart, right-click on one of your worksheet tabs and choose Insert. Next, click on the chart icon and click OK. Excel creates a chart using the default chart type.
Having just created a chart, Excel will display three contextual tabs headed “Chart Tools”. The contextual tabs consist of Design, Layout and Format. The Design contextual tab enables you to change the chart type and the basic information about the chart such as the underlying data.
The Layout tab offers you a more intricate level of control over the various elements within your chart. For example, by default, Excel adds a legend to each new chart. If a chart has only one series of data, we don’t need a legend to tell us what the chart colours mean. We can therefore click on the Legend drop-down menu and choose None.
The Format contextual tab gives us the most primitive control over your chart elements. It is here that we are able to click on individual items and change them at the object level. In other words, we are working on these elements purely as drawing objects rather than as elements of a chart. However, even at this primitive level, Excel still indicates the relationship between the chart elements and the underlying data. Thus, for example, when an individual data point is highlighted, Excel displays the corresponding worksheet address in the formula bar.
When creating a standalone chart, you are not given the option of choosing the chart type during the chart creation process. If you want to change the chart type, you have to do so at a later stage by choosing a Chart Type option in the Design contextual menu.
As for the chart sheet which contains the chart, it behaves in much the same way as a worksheet. It can be renamed or deleted by right-clicking the sheet tab and choosing Rename or Delete from the context menu.

If you have any more concerns please comment for email me. Thanks for reading this.

Remove The Problems Connected With Slow Computer Performances!

There comes a time when your computer starts performing slowly. The reasons may be quite different but the main thing is that you can easily remove them. So if your computer starts performing slowly it is rather recommended to look through all your files and find out which programs and files are no longer in use. When you will remove unused and old files and programs from your computer, then it would speed up the latter. It’s common knowledge that most people prefer to download as many free programs or trials as possible, simply because they are free. So far as is known, many people even don’t remember all the names and why they need them. So you just trash your computer and as the result it begins working slowly. It is high time to remove your old unused programs. In case if you don’t know which program may be removed it is recommended to ask for professional help. To the best of our knowledge, most of the programs that you usually install on your computer simply have an Uninstall button. All you need is to go to the Start button and in the Program menu choose the program you would like to uninstall. If not or you just want to make everything properly then you should go to the Control Panel and to Add/Remove Programs menu and choose the program you would like to uninstall. And then after restarting your computer you will notice that it works much better.
If the abovementioned is not your case then you should look through some others options. For example, if you like to use the Internet a lot then it would be useful for you to have a high speed internet connection. I understand that it is more expensive but it worthy. Among the other advantages is the possibility to open the web pages more quickly, as well as receive, download and send files and so on. Besides it is recommended to have an unlimited connection, so that you wouldn’t worry about your speed and the capacity you may use. To the best of our knowledge the fastest internet connection is a cable internet connection. This is the best option for those who works from home or in the office. But if you like to travel a lot there is nothing better for you than high speed wireless connection. As another option you may easily use high speed satellite internet. But for this type of connection you should find out which option it has. So, as you may see the better the speed of your Internet connection is the better your computer works.

Thanks for reading this. If you have any more concerns please comment and email me at jack_store@rocketmail.com

Few possible reasons why your computer might be acting slower and stupid!!!

We have every reason to believe that a modern man can’t imagine its life without a computer. Indeed it became an integral part of our life and when something goes wrong and our computer starts performing slowly we really don’t know what to do. You should not get frustrated. Actually all you need to do in this situation is research the cause for your computer to slow down. When you will know the reason you would be able to restore it back to normal performance. To the best of our knowledge, in fact there exist 4 possible reasons. So let’s look at them closer in order to understand how to get rid of them. So the first common reason is system registry error. As a matter of fact this is the main reason why your computer starts performing slowly. The main problem is that many users don’t know what a registry is, so they don’t know how to maintain it. It would be useful for you to know that registry keys are important part of the system. They consist of instructions which software and hardware should follow in order your computer run properly. However with time your registry entries may become messy. This is caused by the fact the computer not always restores the default settings. This means that the program will need more time to find the proper instructions. In order to get everything back to normal you will need just to clean up your computer registry. There are plenty of different registry cleaners available on the Internet.
The next option is viruses. If you are regularly downloading files from the Internet then there is a great possibility that your computer may be infected by viruses. Nowadays you may easily install any anti-virus software you like on your computer. In some severe cases when the viruses cannot be removed from your computer, then you will need to re-install your operating system. Don’t forget to make back up of all your data.
The other reason why your computer runs slowly is insufficient RAM. All you need to remove this problem is to upgrade it. If some time earlier it was sufficient to have the RAM of 512 Mb but now it is insufficient. In order to check much memory you have, you may do it by making right click on My Computer and choose Properties menu.
And the last possible problem is spyware and adware. The thing is that when you prefer to download files from free sites there is a high risk to get such software onto your computer. They are actually intended to track all your browsing habits. This information is gathered and then is sent back to their main sites. In order to remove them you will need anti-spyware program. Need anti-spyware softwares? Contact me at jack_store@rocketmail.com

Thanks for reading this.

Make your computer run smoother...


If you have a computer then with time you will have definitely some problems with it. If you want the latter to happen less frequently it is recommended to fulfill several simple steps. In addition it should be mentioned that you don’t need to be a computer expert in order to perform these procedures. Of course, your computer will never be the new again, but still you may prolong its life. 

The first thing you should do regularly is disk cleanup. It’s not a secret that each time you enter the Internet, delete some files, and open any attachments your computer records your activity. To the best of our knowledge, mainly these file are not harmful and they do not take much space. But, on the other hand, if you perform many actions every day sooner or later your computer will have not enough free space as it will be filled with these files. As the result your computer will slow down significantly. In order not to allow this you may use the Disk Cleanup program which comes with Windows. This utility will remove all unwanted and unused files from your computer. As the result you will get more storage space on your computer that may be now used by more useful files and programs. One of the important things for you to know is that you should perform such cleaning regularly. For example, if you use your computer every day and perform rather complicated actions, it is recommended to perform the disk cleanup at least once a month, and then your computer would run smoother.
As you should perform regular disk cleanup, you should do regular defragmentation of your computer hard drive. This procedure will help you to arrange your files. As the result your computer will start working more efficiently. The reason is that each time you add or create and then remove the program – there appear some free spaces. So next time when you try to add some program it will be written to the free spaces. That’s why the computer will need more time to perform the required operation. The Disk Defragmentation option you will also find in your Start menu. It is not recommended to use any other programs while defragmentation. Besides it is quite easy to operate and afterwards you will see that your computer runs smoother.
When you start noticing that strange things happen, as well as there appear the inappropriate pop-ups, some odd icons etc – this may mean that you have adware and spyware on your computer. These are the files that may be downloaded to your computer and you may not know it. Unfortunately they are here in order to steal some information: for example, your browsing preferences, as well as your passwords and credit card details etc. Mainly this information is provided back to the site or to the third parties. Besides, such adware and spyware significantly slow down your computer performance. But, don’t worry: you can easily remove them from your computer. Just use one of the free anti-spyware software. Or email me to receive the best anti-spyware software(or any protection software you need) just for $12.

Thanks for reading this. Email me if you have more concerns at jack_store@rocketmail.com

Do you think viruses are only bad programs that can damage your computer??? Learn about Spywares and Adwares and protect your computers from them!!!

It’s not a secret that we cannot imagine our modern life without computer and Internet. These are, perhaps, the best inventions of the humanity. Here you may find any kind of information just by one click. You may freely communicate with your friends, relatives, colleagues and other people. But not everything is perfect here as not all users have verifiable credentials. Sometimes with the internet there come some unwanted programs or as they are also called adware and spyware. The thing is that they may be in your computer and you wouldn’t know about it. They may do harm to your computer and you personally as mainly they track your browsing preferences and ma even steal you password or bank and credit card details and provide it to the interested parties. To the best of our knowledge, mostly such interested parties are advertisers, who use this information in order to send you then spam. That’s why in many cases it is quite urgent to find the right software which would remove such spyware and adware from your computer. Besides, if there some adware and spyware on your computer it may significantly slow down the performance of your computer. In some cases these software may change your files and data. Unfortunately most people think that such programs may be found on the specific so-called adult sites so such people are not careful while using other sites, that’s why their computers are potentially at risk. We have every reason to believe that even big corporations like to use such information in order to understand the purchase and spending habits of their clients. That’s why they have so-called public privacy policies. So when you think that you are just safely visiting a site, actually there is a great chance that this site has scanned your habits without your knowing it. It would be useful for you to know that every time you enter any site it collects some common information and this may influence upon the performance of your computer. Of course, you cannot compare the impact of the adware with the virus but in fact it will slow your computer performance and in severe cases, may even render your machine virtually unusable.
You can easily understand that you have adware and spyware on your computer, if during browsing of the site there appear different pop ups. The latter are intended to direct you to the other site by some attractive picture or so. But as soon as you will visit this site, the spyware or adware gets to your computer. Sometimes even you may send your friend a link with the spyware without you or your friend knowing about it. That’s why it is rather important to protect your computer. Of course you may be cautious while opening e-mails and especially the attachments. But as well you may install anti-spyware software and scan your computer for the presence of such programs and remove them from your computer.

Ways to protect MS Windows systems from viruses

Nowadays as the Internet and other networks are greatly developed computer viruses are distributed rapidly and intensively. Everyday several new viruses capable to damage considerably your computer system arise. Anti-virus specialists work hardly to make updates their software against new viruses as soon as possible. The viruses can get inside computer in different ways. That is why there is no simple method to protect system. Only series of measures can give you reliable protection from the infection. Below are 9 steps to protect MS Windows based PC system from viruses.

1. Make regular backups. It should be said that there is no absolutely safe way of protection. Virus creators regularly find holes in new computer products to use them for infection of computer systems. Some dangerous viruses can considerably damage data files or even erase entire file system. Make regular backups of your data files to separate file storage device. It can be separate hard drive, flash card, compact disc or another file storage device which you choose. To ease the procedure you can use some automatic backup software. And be ready if the system will die because of virus infection.

2. Be ready to reinstall your system if it dies because of viruses. Get distributives of your operation system and distributives of software which you use and keep them together, for instance, on a set of CDs not far away from you. In this case if virus infection will cause unrecoverable system failure you can rapidly reinstall your working medium.

3. Protect your network connection with Firewall. Firewall is a software which blocks suspicious potentially dangerous connections to preventing viruses from network to penetrate into your system. Windows XP system has quit simple but reliable built-in firewall. You can enable it as follows. 1) in Control Panel, double-click Networking and Internet Connections, and then click Network Connections. 2) Right-click the connection on which you would like to enable firewall, and then click Properties. 3) On the Advanced tab, check the option to Protect my computer and network.

If you need more flexible control of connections with network you can get and install more advanced firewall software like Norton Personal Firewall or Outpost Firewall. If you use this software you have ability to permit or to block particular connections and to monitor network activity.

4. Use antivirus software. Install antivirus software which will scan your system searching and erasing viruses on a regular basis. Click this link to find about the best anti-virus protection you will get today.

5. Regularly update operating system. Windows has built-in automatic update service. It regularly contacts Microsoft server to find updates and notifies you if updates are ready to be installed. Updates are important because hackers regularly find holes in operating system which are often used by virus creators.

6. Don't install and don't run suspicious software. Check new programs which you are going to install with anti-virus software. Don't download software from suspicious websites. To download software always seek website of software creator or official distributor. Do not open applications received by email from unknown persons.

7. Limit access to your computer. Protect enter to system with password.

8. If you use Internet Explorer, consider moving to another browser. As IE is the most distributed browser today virus creators actively use defects in its security system to infect computers. Infection may arise if you will visit webpage which contains invisible harmful code. You are more safe if you use less known browser only because virus creators do not pay much attention to it. Major IE competitors Firefox and Opera browsers provide now the same comfortable interface and range of services for working on the Web.

9. Use spam protection. Viruses are often distributed via email. Switch on spam filters in your email box to block spam receiving. If you need assistance with using of the filters you can ask your email service provider.

Something about Image Resolution and its concerns

A question I’m currently receiving on a weekly basis is ‘how many pictures will I be able to fit on this’ when a customer is referring to the size of memory card or USB Flash Drive.  Understanding image resolution and size is important in this digital age and although the intricacies are incredibly complex, the basics are pretty easy to get to grip with.
What is Image Resolution?
A pixel is a unit of programmable colour on a computers display and by combining many of them together we are able to create an image; the term resolution typically refers to the number of pixels that are used in this process.  On the whole, the quality of the image will increase with a greater number of pixels as we are able to store a greater amount of detail.
How is Resolution Measured?
Resolutions are generally expressed in two different formats – either the pixel dimensions of the image are given or the total number of pixels used in its creation.
Most digital cameras express their maximum resolution in terms of megapixels (millions of pixels) that can be used to create an image; an 8 mega pixel camera would be able to break a picture down in to 8 million pixels hence giving a higher resolution that a 5 mega pixel camera.
The resolution of a computer image on the other hand is usually expressed by giving the number of pixels present on a line and the number of lines used in the image.  For example, an image measuring 1600 x 1200 would contain 1600 pixels per line and a total of 1200 lines giving a total of 1,920,000 pixels (1.92 mega pixels).  As the image contains a greater number of horizontal than vertical pixels we can assume this picture would be landscape rather than portrait.
How does Resolution affect File Size?
The more pixels an image contains the larger the file is likely to be; this is due to the fact that storing information relating to 10 million pixels is liable to require more space than saving a lower resolution 1 million pixel image.
There are several other very important factors to consider:
File Format – Over the years there have been many different image file formats, each introducing new advantages and disadvantages and covering them all would take an article in itself.  The two you are most likely to come in to contact with when using a digital camera are JPEG (smaller images that often include compression) or RAW (Completely unprocessed images files which are of a higher image quality but also substantially larger)
Colour Depth – Along with the total number of pixels that constitute an image, we also have to consider the potential number of colours each pixel could be.  If, for example you save your image as a ‘line art’ image where each pixel can be either black or white then the amount of data required to store this information is less than if you set a colour depth of ‘true colour’ where each pixel could be one of 16,777,216 potential colours.
Compression – Many image formats, such as JPEG allow you to adjust the amount of compression that is utilised when saving the image.  Compression can work in a number of different ways but ultimately it works to minimise the amount of data required to save the image.  This is usually achieved by looking for areas of commonality (for example a shape or pattern) and saving the description of that area which the computer can then later reproduce when reloading the image rather than defining each individual pixel.

Thanks for reading this. If you have any more concerns then please email me at jack_store@rocketmail.com

Talk on 802.11n Wireless Networking

It’s been years in development of 802.11n Wi-Fi that have quite changed our experience with the wireless network.
Presently the majority of the wireless hardware you will buy (routers, wireless network cards, printers etc) will use a networking specification called 802.11g which has a maximum speed of 54Mbps. This maximum speed is being increasingly seen as inadequate as applications become more complex and require more bandwidth.
The successor, 802.11n is being ratified to increase both the speed and range of wireless devices however it should be noted that due to the time the IEEE Task Group n have been arguing about the intricacies, equipment manufacturers got bored and decided to run with the draft specification. As a result, the fact that 802.11n is becoming ‘official’ is unlikely to change a great deal as hardware utilising the new standard has been available for some time now. Although these devices have been produced working on the draft specification, the reality is that there are very few differences between this and the anticipated final ‘official’ release.
Essentially based on the current 802.11g standard, 802.11n uses some new technology and tweaks to give Wi-Fi more speed and range. The most notable part of this technology is called ‘multiple input, multiple output’ or MIMO for short. MIMO uses several antennas to transmit multiple data streams simultaneously rather than a single antenna transmitting just one stream of data. This allows more data to be transmitted in the same period of time while also increasing the potential range of the network.
Other technologies include payload optimisation which results in more data being transmitted in each packet and channel bonding which can use two separate non-overlapping channels at the same time to transmit data. The result is all this is achievable data transmission rates of around 100Mbps and double the potential range of 802.11g.
There are no security enhancements as they simply aren’t needed; the WPA2 encryption standard provided by existing network hardware is considered by most to be ‘extremely secure’.
It’s worth checking the box of any network equipment you have purchased in the last couple of years as you may find it is already compatible with 802.11n and simply needs setting up correctly. It goes without saying that in order to benefit from the faster speed both the transmitting and receiving devices both have to support 802.11n; A 802.11n router working with a 802.11g laptop will result in slower 802.11g speeds.
At present ‘n’ rated hardware is more expensive than the older ‘g’ standard however not prohibitively so; our ‘n’ rated wireless router typically retails for around a tenner more than the £25 ‘g’ rated equivalent. Of course, if you are already happy with your wireless network and the upgrade will mean replacing perfectly functional hardware it is certainly worth considering whether your needs warrant the faster hardware.
At present 802.11n will only be required by those with blisteringly fast broadband connections or those that regularly copy large volumes of data across a wireless network however it will soon become the norm. If upgrading your hardware, therefore, it may well be worth paying a couple of extra pounds now to ensure that you remain future proof.

Thanks for reading this. If you have any concerns please email me at jack_store@rocketmail.com

Small story about Apple... The iTouch effect!!!

In a time when everybody suddenly seems to be looking to Apple for the next exciting piece of new technology, I’m forced to look back and wonder when everything all of a sudden started to go ‘right’ for them.
Things haven’t always been this rosy for Apple; back in 2001 the ailing technology company posted a year loss of $25 million on revenues of $5.3 billion however, just 7 years later, they posted a $4.8 billion profit in 2008 based on revenues of $32.5 billion.
Such a turnaround is quite remarkable and seems to coincide very much with the release of the iPod; a revolutionary portable media device which enjoyed its first full year of sales in 2002. Initially released in October 2001, the iPod was easy to use and included a large hard drive which had an incredibly large storage capacity compared with the flash media based players of the time. Suddenly, rather than just being able to store a couple of albums on their media player, users were given the ability to store thousands of songs on a device small enough to fit in the pocket.
Over the years the line has been revised several times with the largest commercial available iPod created topping out at a 160GB storage capacity which is enough to hold around 40,000 songs. The current series of iPod touch units feature a touch sensitive colour screen, motion sensor, Wi-Fi and a more realistic maximum 64GB of storage.
Presently Apple claim to dominate the portable music device market with a 73% market share, having sold over 210 million units to date. On top of the revenue generated by the sale of hardware, there is also the huge revenue generated by iTunes which is the associated song download site for the iPod. Having signed the five major record companies up to its service, iTunes boasted total sales figures of over 6 billion songs at the beginning of this year. The service now also offers video content such as TV shows and movies for users of newer machines.
The most interesting point to note is the halo effect that has occurred with other areas of the Apple business following cultural acceptance of the iPod as a ‘cool’ piece of technology. Users appear to have subscribed to the Apple brand and very few analysts would deny that the tremendous uptake of the iPod has had a positive effect on other areas of the business.
The most notable spin off has been the Apple iPhone which since its release in June 2007 has sold over 21 million units. Although we cannot attribute the high number of sales directly to the iPod, there are strong similarities between the two devices in terms of design and desirability.
If we look at the Apple Mac computer, suddenly it has been accepted as a sexy alternative to the boring PC. The market share is still at a relatively small 11% worldwide however this compares favourably with the 4.1% figure that was circulating back in 2001.
I think it is fair to surmise that Apples current good fortune in recent years is predominately down to the new found desirability that allows the products to command their high price tags. In order to ensure this status isn’t lost tomorrow they will need to build on this momentum so that products of tomorrow remain more than simple items of technology, but rather objects of desire.

Thanks for reading this. If you have any concerns please contact me at jack_store@rocketmail.com

Something about the ISO Format

One of the most common file types used in the distribution of software over the Internet is the .ISO format; these single files contain within them an exact copy of an entire CD or DVD disc. They are ideal because rather than having dozens, hundreds or even of thousands of files to transport you only have one.
There are of course other methods of achieving the same goal; some of you may be familiar with .zip or .rar files which have the added advantage of being able to not only take many files and store them temporarily as one but also compress the data, making the total file size smaller. Unfortunately, when using this method on a media disc you strip out important characteristics of the original such as boot code, disc structures and file attributes which can often prevent an application from running.
As a result of this exact copy process, the format has become a popular method of transporting pirated software – the ISO file is an exact match of the original and as such there is no reason the software would realise it had been copied and refuse to run. There are plenty of legal uses for the format, however, and it is highly likely that even the most legitimate users will come in to contact with an ISO file at some stage sooner or later.
Unfortunately they are not the most user friendly file format; you can’t simply complete the download then double click to run the application as they first have to be returned to their original format. There are typically two methods that can be used to complete this process; burn the data back to a physical disc or create a virtual drive on your computer.
The first method relies on a piece of disc burning software such as the fantastic and free CDburnerXP (www. cdburnerxp.se). Simply click ‘burn an image to disc’, point the application in the direction of your ISO file, insert a blank CD or DVD and your computer will then spit out an exact copy of the original media as if it had come direct from the manufacturer.
The second method uses a piece of software such as the free Alcohol 52% (www.alcohol-soft.com) to create a virtual drive that can simulate an actual CD or DVD disc. By asking Alcohol 52% to ‘mount’ an ISO file downloaded from the Internet, Windows will be tricked in to thinking there is a physical drive connected to your computer containing the original disc. You simply access it through Windows Explorer as you would any other regular drive connected to your computer.
This latter method prevents us from having to waste a blank CD or DVD which is especially handy in instances where it would have only been used to install the application before being discarded. We can also keep the original ISO file and mount it whenever it’s required rather than having to store and locate a physical disc when the data is required again in the future.
There are additional benefits, especially when it comes to speed. Not only does it take seconds to mount an ISO file, rather than the minutes it would take to burn it, but in addition the speed of reading the data is exponentially faster. A virtual CD for example will read at 200x speed whereas the fastest CD drives on the market are limited to 52x speed.
Some users may also appreciate the ability to create multiple virtual drives that can function simultaneously; this is useful if you have more than one disc that you need frequent access to without the need for multiple readers. You can create copies of your own discs and load them up on to multiple virtual drives in this fashion and as long as you own the original it is perfectly legal.

 Thanks for reading this. If you have any concerns please email me at jack_store@rocketmail.com

Windows 7 Hidden Secrets – Additional functionality!!!

I have been using Windows 7 for quite a while now and I have actually found some hidden secrets or the hidden gems that people might be interested in to use. Here are some of them:


Aero Shake
In Windows 7, when you click on the title bar of any window and shake it every other open window gets minimised straight back in to your taskbar, reducing clutter on your screen.  This allows you to focus on the one window and then when ready shake it again and the other windows will reappear.
There are additional Aero user interface related features which make a welcome debut.  These include Aero Peek which allows you to immediately see what’s going on in an application just by hovering over the icon in the task bar and Aero Snap which quickly allows you to rearrange your desktop by slamming any open window against the left, right or top side of your screen; try it!
Sticky Notes
Proof, if needed, that some of the simplest applications make the largest differences to the end user experience.  One of the most commonly used applications on my PC used to be the incredibly simple ‘notepad’ as I find that my working life works a lot better if I simplify everything down in to lists.
Rather than jotting notes on random pieces of paper that will almost certainly get lost throughout the day I used to dump everything in notepad and ensure that every line was eventually cleared so I was left with a blank page before I went home.
Sticky notes have a similar application.  To get started click on the start menu and type in ‘sticky’ and begin typing tasks for the day or things to remember in to little post it notes that stick to your screen.  When complete either close or minimise the application to get back to the job in hand, safe in the knowledge that once Sticky Notes are reopened, these tasks will reappear exactly as you left them.  When a task has been completed or the note simply isn’t needed, it can be deleted with one click of the mouse.
Improved Calculator
Windows 7 calculator has improved considerably; now rather than being an arithmetic only affair, it can be operated in four modes – Standard, Scientific, Programmer and Statistical.  It can also perform unit conversion, for example grams to ounces, metres to feet and Celsius to Fahrenheit along with a couple of unexpected features such as the ability to calculate the number of days between two dates or the value of your mortgage repayment.   Surely in the next version of Windows the calculator application will finally gain graphical capabilities.
Windows Disk Image Burner
For some time now the preferred method of copying and storing CD’s and DVD’s has been by using an ISO file; a single image which includes the contents of an entire disk.  Reading these files used to require a specific application (the likes of which I’ve covered previously in Click) but every version of Windows 7 now includes support for these straight out the box; simply double click on the ISO file that you wish to burn, insert a blank CD or DVD and you’re done.

Thanks for reading. Email me at jack_store@rocketmail.com for more information.

How to make your own theme for windows 7

Windows 7 has best look and feel as compared to windows vista. One thing which I really liked about windows 7 is possibility of personalizing and customizing windows 7 with our own custom themes. Well don’t guess that creating custom windows 7 themes is geeky task but its far simple then previous windows operating system. 
Micorsoft as introduced style and desktop slide shows in windows 7, which are enough to help us in customizing windows 7. In windows 7, styles are called as Themes and windows 7 Themes/ Styles are a formal combination of desktop background, Aero glass window color, sound scheme, and screen saver.
Windows 7 has several default themes and some of them are hidden themes which you can unlock. You can also download windows 7 themes from Microsoft windows 7 website. Incase you want to create your own create Windows 7 themes then here is small guide on how to create Windows 7 Themes.

How to Create Windows 7 Themes

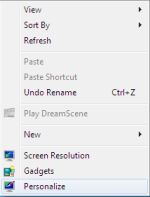
1. Right Click on your Desktop and Select Personalize from Context Menu
Personalize to Right Click
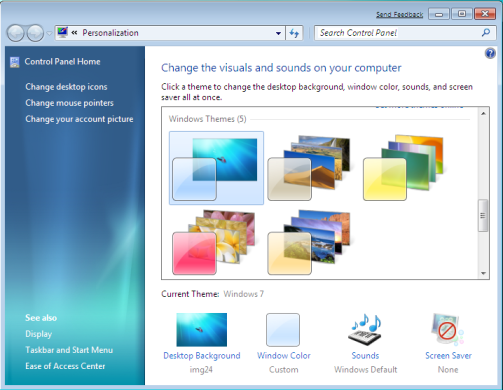
Windows 7 Personalization
2. Now click on “desktop background” to change background wallpaper
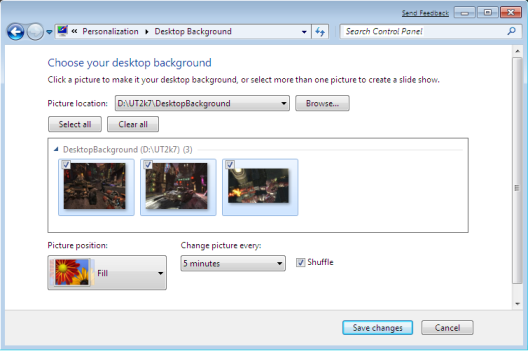
3. Click Browse to locate folder of high resolution wallpapers
4. Select check images/wallpapers if you want to have slideshow feature in your theme
Select Background Images
5. Click on save changes.
5. Now click Windows color to change color of windows, background, and cursor
6. Click on sound to change system sound default and change screen saver.
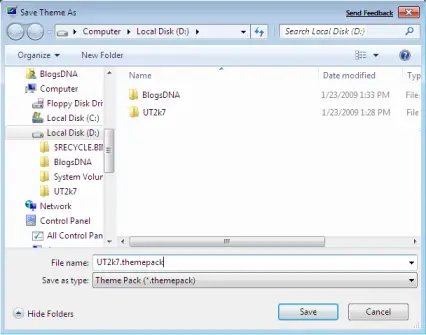
8. Once you have finished your customization click on save theme option in your personalization window.
9. Enter theme name and select thempack as save type
Save as themepack
In order to install theme just double click on themepack file.

How to convert ipod touch to an iphone!!!

Hello Everyone,

Today I m going to "tell" you how to change an ipod touch to an iphone... I have been using this ipod touch I have as an iphone for quite a while and now I want to share this with everyone about how I do it!!! And it have worked pretty well for me so far...

Benefits you get from it:

1. You can call other people from your ipod touch

2. You can receive calls from other people in your ipod touch!!!

3. You can send and receive text messages for free too!!!

4. You do not have to pay for anything.. Calling or receiving or texting!!!

5. Everything is legal(you don't have to break any rules if you don't want to!!!

Catch(Things you may not like about it!!):

1. You need be in a wi-fi region for this    to work!!!

2. You will be using more than one program for it, which may be quite a problem if you think in that way...

Things you will need:

1. Ipod touch of course!!!

2. be in wi-fi region...

3. its good if you have your computer infront of you when you are doing this!!!...

4. You will have advantage if your ipod touch is jail broken for multiple reasons that I m going to tell you        later... But its not mandatory!!!

       Cheers!!!

5. A microfone to speak when you are in call!!!


Ok, Lets start..

First, calling from your ipod touch!!!

You have a lot of programs in your app store for this purpose but most of them will ask you to pay some money after you make few trial calls!!! But I have one for you that will give you access most of the times..

Now, goto your app store in ipod touch and seek and install this program called "iCall".... Now start this program and start making calls!!!

There are few catches for this program which are as follows:

1. You can only make the call of maximum of 5 minutes and it will hang up by itself and you have to redial again...
I know this sucks but this is how you get it for free!!!

2. You will hear an advertisement before the ringing actually starts(may be for first 18 seconds) after you call...

3. You have to save the number with +1(if you are calling an United States number) or country code and then dial because you  cannot actually type + in the dial pad in icall(i connot do in mine atleast!!)

And when you call from this number the receiving person will not get any number... So you can think this as a problem or advantage depending upon what you are doing!!!

And they also have a paid version of the calling service...

Now, the second part!!
How to get a number and receive a call???

There are multiple steps for this so be patient!!!

1. You will need a sip account first!!!
    How to do that?? Follow next step...

2. Download voipbuster program from here

3. Install and run the program and register for the voipbuster account(you will see the sign up sheet when you start the program for the first time)!!!

4. Now install this program called Fring from your app store in your ipod touch!!!

5. Open the program and click in "More" at the bottom of the screen in Fring!

6. Click on Add-ons

7. Click Sip from there and select voipbuster...

8. Input your username and password there from the account you just registered in voipbuster program!!!

9. Click OK!!!

10. Now getting number: Goto this website called www.ipkall.com

11. Click sign-up!

12. Fill the form as follows:
     Account type: SIP
     Area Code: Doesnot matterwhat u choose(whatever you prefer!!!)
     SIP phone number: your username from voip buster
     SIP Proxy: sip.voipbuster.com
     Email Address: Your email
     Password: What ever you want
     # of seconds: Your choice again!!!

14. Put in the word you see and click submit!

15. You will then receive 2 emails: First, saying that you requested for a number and second giving you your number. If you are really unlucky then it will take about 10 days to get you a number but normally you         will get it within a day!!! So, be patient!

16. Open fring and ask someone to call you on the number you received on email!!!

So, here's the problem with it!!!
1. Fring should be open for you get a       ring for the call other wise you will      just receive a dialog box saying     that someone tried to call after they     hang up!!!

Fix: This is when the jail broken device comes handy!!!
Download this program called backgrounder from cydia and then just run fring on background everytime!!!

Non-jailbreaked device: Sorry, you have to keep fring open all the time!!!


Now text messaging part!!!
You have tons of programs in app store to do that!!!
But I have two preference for this purpose:

1. TextFree:
   It will cost you some money to install    from app store... But if you are jail     broken then just download for free!!!   And enjoy the unlimited texting!!!


The texting in this program works completely like iphone texting!!!
And it is great!!! I love this program!!! Except when I m sending message to an iphone!!!
Iphone, for some reason doesnot receive all messages from it!!
So, I use another program for it

2. Text plus!!!
I think this also cost some money if your device is not jail broken!!!

Download and enjoy!!!

Thanks for reading this!!!

Have a great time and enjoy this transformation of your ipod touch to a full functional iphone!!! :-) cheers!!!

If you have any questions or concerns please email me I will get you back as soon as I can...


Here's the link if you are interested to know about advantages and disadvantages of jail broken device:

http://urproblemandoursolution.blogspot.com/2010/01/lets-talk-about-jail-breaking-in-iphone.html

Transform you computer... Bring fun back with little programs!!!

Microsoft Windows have been around for a while now. Other than just few visual effects like Aero, Windows 7 barely does something exciting for me. So, I thought of trying other third party programs to see what windows can do to have some exciting look. I tried a lot of programs so far. There a huge list of programs that I have just to give a try. Following video shows you my desktop:


There are just a few programs that I have used. They are: Real Desktop, Shockwave3D and Rocketdock. And following are just few of the programs I have actually tried:

RocketDock,
Shock4way3D
ShockDesktop3D
TopDesk
BumpTop
DeskSpace
Finderbar
Leftsider
When I had XP I tried vistart
Windows sidebar
WindowsBlinds
Bootskin
Logon Studio
LeopardXP visual style
Yahoo Widgets
and many more that I cant even remember...

So, basically I love tweaking with my computers and try new things and love to have a good look at it. In the youtube video I posted, its just a few programs that I had when I actually made that video. And my computer is not very new. Especially my graphics card is really bad. But it still is good for my computer what you saw in the video.

Now, I will talk few things about the programs I used there.
First the Real Desktop.
Real Desktop is a program that makes your desktop look like a 3D box. It will make it look like as if oyu are looking inside a cuboid box. The icons will be like a small piece of wooden, or metallic(depending upon your settings) squares. You can literally pick it and throw it anywhere in the box that you can see. You can also pick and put it in the trash can.  To pick up these icons you have to click both mouse button at same time and move it. You can also decorate the box with sticky notes and soccer ball. You can stack the icons too. and stick the sticky notes on the walls. You can also change all the wallpapers of the sides of the box. If you want to download real Desktop then you can do that by clicking here: Download Real Desktop free

Second the Shock4way3D.
Shoch4way3D is the program that will give you 4 desktops!!! Isn't that amazing??? You can do different things on different desktop without even other people knowing about it. If you are working very private and someone comes to your room suddenly then you can actually change the desktop with a shortcut key and when they use it, they will not even know what were you using unless they know about it program. For me it is really handy. And best part about it is that it is completely free. And it also have have cool graphics and a lot of features that you will really enjoy playing with. There are other programs to do the same thing for you and I have tried most of them. But since my graphics is not that good, I found this program to be the best for me because it is very very light weight. I don't even have to bother about cracking for making patch for this program. So, if you want to download it, then you can do it from here: Download Shock4way3D

Third one is RocketDock.
Many people may be familiar with the rocketdock. It is present there in all Apple computers as a Dock at the bottom of the screen by default. It is the same dock for windows. You can add programs in the dock and clear all the programs the desktop and keep it clean. I personally do not like the mess in the screen. And it is really good if you are same kind and have this rocketdock in your windows computer. In this rocketdock you can also customize the icons by yourself and you can even put the animated icon for the programs. And this program is also completely free to download. And you can do it from here: Download Rocketdock
And for the icons pack and animated icons visit http://www.rocketdock.com

Brief Descriptions of programs I have mentioned earlier:
ShockDesktop3D: It is also same as Real Desktop but the difference it that this is really really light weight again. It does not have all the features of real desktop but it have few features that even real desktop doesnot have. Frankly speaking I prefer this program to Real Desktop not only because it is light weight but also because if some of its cool features like cuboidal icons and a lot of other things too. And its easy to handle according to my personal experience. You can download it from here: Download ShockDesktop3D

TopDesk: The feature this program provides is already there in Windows vista or later version of Windows(When you press Windows Key+Tab). So, basically windows XP users might be interested in it. And what it does is, just shows all the opened windows in stacks so that you can open the window that you want to work on, easily. Download TopDesk trial version from here, Problem with it is that it is not free. But if you want contact me.

Bumptop: It is also same as ShockDesktop3D or real desktop. When I used it, I had few problems with it like it is really memory consuming and really slow. But if you have better hardware, then you will definitely love it. But personally, I did not like it that much. And also it is not free. You can only download pro version now. There is no free version at all. So, if you want go give it a try just contact me again.

DeskSpace: Its also a virtual desktop program like Shock4way3D. But it have six face like a dice rather than 4 faces. I prefer Shock4way3D to Desktop for it being light weight but you might wanna have a try at DeskSpace. But it is not free again. So, if you want contact me or Download the trial version here.

Finderbar: It is like a theme for microsoft windows that will put a finder bar in your start menu like it is there in mac computers. You will need to patch a system file to do it, but if you are interested, then I put another blog tutorial on how to do it.

Leftsider: Leftsider is a small tweak for windows that will put the three windows button(at the top: minimize, maximize and close) to the left like in mac computers.

Vistart is a program for windows xp that will change the start menu that windows XP have to be like the one in vista or 7.

Windows Side bar for XP is program that will install the side bar to use on windows XP from Vista.

Bootskin is the program that will change the boring screen that you will see when computer is booting up in windows XP or vista to a custom designed picture. You can also change the picture to what ever you want it to be but you will need a lesson on how to do it. If enough number of people are interested, then I will post the tutorial on this topic too. You can download Bootskin from here: for XP, for Vista but if need more premade skins, then contact me.

Logon Studio: Change the Logon screen of the windows: the screen where you put in your password when you start the computer. Download it from here or contact me.


Thank you for reading this. I hope you liked it. And if you need to ask something please email me or put a comment below. My email is jack_store@rocketmail.com

Running command prompt in full screen in windows vista or later version of windows...

Today I am going to write about a issue in Microsoft Window's later versions regarding the DOS or command prompt. After Windows XP Microsoft Windows does not have DOS anymore. It only consists of command prompt which is shortly called command or just cmd. You can open this by typing cmd at start menu in Windows Vista or Windows 7. But the main issue people might talk about this is the full screen mode of this cmd.exe program. This is mainly useful for program if they can use cmd in full screen mode. So, here I m going to talk about how you can actually just make it like full screen even though the windows does not support it.

The conventional way of making full screen is by pressing Alt+Enter. But when you do that to cmd in Vista or 7, you will get this message saying that "The system does not support the fullscreen mode." So, lets try to get something even though it does not allow us to do that.

 Follow the steps that you see below and please comment if it is working for you or if this helps.


It's rather odd but I've verified that it works.
  • Click Start and type CMD, but don't hit enter or click on cmd.exe.
  • Right-click cmd.exe above and choose Run as administrator.
  • Respond to the UAC prompt.
  • In the command prompt enter WMIC--you'll get a different prompt for Windows Management Instrumentation Control (but you're not going to actually DO anything with WMI).
  • Click the normal maximize button at top right. The Command Prompt window will fill the screen.
  • Enter EXIT to exit WMIC.
  • Right-click the Command Prompt's title bar, choose Properties, click OK.
  • Enter EXIT to exit the Command Prompt.
From now on Command Prompt will open at a size that fills the screen. It accomplishes this by as many rows and columns of characters as necessary to fill the screen. If that's not the kind of full-screen you wanted, you can put Command Prompt back to normal thus:
  • Right-click its and choose Properties.
  • Click the Layout tab
  • Set Screen Buffer Size's Width to 80
  • Set Window Size Width to 80
  • Set Window Size Height to 25
  • Click OK
I'm guessing that what you really want is to have the command prompt literally fill the screen without changing its 80x25 layout. In XP you can toggle this mode by pressing Alt+Enter. As I mentioned earlier, doing that in Vista or 7 just gets you a error message. And it's true; the Windows Vista or Windows 7 Display Driver Model (WDDM) precludes support of the necessary video mode.
There is a kind of solution, and it's even recommended by Microsoft.They suggest replacing the driver for your graphics card with the equivalent XP video driver. You'll lose the ability to run Vista's spiffy Aero interface if you do so, but you'll gain back the ability to run full-screen DOS programs. But that may not be what you would really want to happen...

Thank you for reading this. Hope this helps. If you need more help or suggest something for me or need something then please email me at jack_store@rocketmail.com. I will try to reply you before 24 hours.

How to get amazing scores for Bejeweled Blitz on facebook

Here's my game play video posted on youtube:
http://www.youtube.com/watch?v=PockVcbBs-o

I would recommend you to read the notes before you start with the steps.

If you love Bejeweled Blitz on facebook and if you are also interested in beating all your friends or making high score, even a million then then I m going to show you how to do it. It is a cheat for the bejeweled blitz game that is working till date today. And this is only if you want to make a big score. If you enjoy just playing it, then you don't have to do it. Just good to know that you can do it(make very scores) easily. So, follow the descriptions below and you will be probably making a million for bejeweled today.

1. Download this program called cheat engine if you don't have it already by clicking here.

2. Install the  program.

3. Run the program.

4. Click on the little computer icon on the program as pointed by the arrow the in following picture:


5. You will see the list of all processes going on in your computer. From that list, find firefox.exe as shown in the picture below:

6. Click open of press enter. And then click on the "Enable Speedhack" in the main window of cheat engine which is located in the pointed area in following picture:


7. After clicking that, select your desired slowness of the game. In the video that I provided, I was playing at 0.125. You can type that in the box or move the slider that you can see like in the picture below:


8. After that hit apply below the slider and go back to your browser and open the game. Your game will be now very slow if you have input a number less than 1 or it will be faster if you have input more than 1 depending upon your applied value.


Thank you for reading this. Check my other blogs, if you have curiosity about computers or technology. You can also email me at jack_store@rocketmail.com if you need anything(movies, songs or softwares). And if you want to ask me some question, or have some problems then please email me. I will try to reply your email within 24 hours of time.
Enjoy and have a great day.

UPDATE 1:

Ok guys, here's the first update to this blog who have been complaining that its not working for them and this should work cuz I tried it today on Sept 3 2010.

Here's what u need to change:

Everything the same until the step 4.

On step 5, instead of looking for the firefox there, look for the thing that says xxxxxxxx-plugin-container.exe, where xxxxxxxx is the address but if you don't know about it, then don't worry about it.

And after that follow the steps again from step 6 and I am sure you will be happy to see what u see :-)...
And you might also see more than one xxxxxxxx-plugin-container.exe, where only xxxxxxxx will only change to something else. If selescting one did not work then try the other one.

Ok takecare and have fun with it...

Note:
1. For the people who use mac, you will need to download the cheatengine for mac and then install it and then follow the steps. And if you do not know where to and how to get cheatengine for mac, email me(cuz it involves a little complications sometime if you are not very familiar with computers.


2. For the people who are using other internet browser other than firefox, you will have to look for the browser you are using instead of firefox.exe but I would recommend to use firefox, cuz I have only tested it on firefox and internet explorer(and I don't like internet explorer for many reasons and hence I don't recommend it at all.)

Speed up firefox browsing speed....

Yes, firefox is already pretty damn fast but did you know that you can tweak it and improve the speed even more?

That's the beauty of this program being open source.

Here's what you do:

In the URL bar, type “about:config” and press enter.

This will bring up the configuration “menu” where you can change the parameters of Firefox.
=========================================================================
Note that these are what I’ve found to REALLY speed up my Firefox significantly - and these settings seem to be common among everybody else as well like me. And it works better in big connections!!!!

Double Click on the following settings and put in the numbers below - for the true / false(booleans) - they’ll change when you double click.

Code:
browser.tabs.showSingleWindowModePrefs – true
network.http.max-connections – 48
network.http.max-connections-per-server – 16
network.http.max-persistent-connections-per-proxy – 8
network.http.max-persistent-connections-per-server – 4
network.http.pipelining – true
network.http.pipelining.maxrequests – 100
network.http.proxy.pipelining – true
network.http.request.timeout – 300


One more thing…
Right-click somewhere on that screen and add a NEW -> Integer. Name it “nglayout.initialpaint.delay” and set its value to “0”. This value is the amount of time the browser waits before it acts on information it receives.
Now you should notice you’re loading pages MUCH faster now!


Note: Single misprint or any other changes might be making your firefox worst. So, this is just for the educational purpose. If you have any problem then just contact me and if you want I can explain in detail what you are doing. Send me an email. And remember that I am not responsible for whatever thing you do to your firefox here. This is just for the educational purpose as I said before.

Disable "The Send error Report to microsoft"

Well, all the people who use the microsoft windows may be familiar with the microsoft's "Send error report" windows that pops up when a program has been crashed which I think that is basically useless. So, it is better to disable the stupid feature in WinXP which tries to send a report to microsoft every time a program crashes. So for that you will have to do this:

*************************************************************************

Open Control Panel
Click on Preformance and Maintenance.
Click on System.
Then click on the Advanced tab
Click on the error reporting button on the bottom of the windows.
Select Disable error reporting.
Click OK
Click OK

*************************************************************************

Computer Acronyms

For the people who always are have problem from the computer shortcuts they face everyday, or for people who want to learn the acronyms here is the list of most of the computer acronyms for all of you.

--- A ---
ADSL - Asymmetric Digital Subscriber Line
AGP - Accelerated Graphics Port
ALI - Acer Labs, Incorporated
ALU - Arithmetic Logic Unit
AMD - Advanced Micro Devices
APC - American Power Conversion
ASCII - American Standard Code for Information Interchange
ASIC - Application Specific Integrated Circuit
ASPI - Advanced SCSI Programming Interface
AT - Advanced Technology
ATI - ATI Technologies Inc.
ATX - Advanced Technology Extended

--- B ---
BFG - BFG Technologies
BIOS - Basic Input Output System
BNC - Barrel Nut Connector

--- C ---
CAS - Column Address Signal
CD - Compact Disk
CDR - Compact Disk Recorder
CDRW - Compact Disk Re-Writer
CD-ROM - Compact Disk - Read Only Memory
CFM - Cubic Feet per Minute (ft�/min)
CMOS - Complementary Metal Oxide Semiconductor
CPU - Central Processing Unit
CTX - CTX Technology Corporation (Commited to Excellence)

--- D ---

DDR - Double Data Rate
DDR-SDRAM - Double Data Rate - Synchronous Dynamic Random Access Memory
DFI - DFI Inc. (Design for Innovation)
DIMM - Dual Inline Memory Module
DRAM - Dynamic Random Access Memory
DPI - Dots Per Inch
DSL - See ASDL
DVD - Digital Versatile Disc
DVD-RAM - Digital Versatile Disk - Random Access Memory

--- E ---
ECC - Error Correction Code
ECS - Elitegroup Computer Systems
EDO - Extended Data Out
EEPROM - Electrically Erasable Programmable Read-Only Memory
EPROM - Erasable Programmable Read-Only Memory
EVGA - EVGA Corporation

--- F ---
FC-PGA - Flip Chip Pin Grid Array
FDC - Floppy Disk Controller
FDD - Floppy Disk Drive
FPS - Frame Per Second
FPU - Floating Point Unit
FSAA - Full Screen Anti-Aliasing
FS - For Sale
FSB - Front Side Bus

--- G ---
GB - Gigabytes
GBps - Gigabytes per second or Gigabits per second
GDI - Graphical Device Interface
GHz - GigaHertz

--- H ---
HDD - Hard Disk Drive
HIS - Hightech Information System Limited
HP - Hewlett-Packard Development Company
HSF - Heatsink-Fan

--- I ---
IBM - International Business Machines Corporation
IC - Integrated Circuit
IDE - Integrated Drive Electronics
IFS- Item for Sale
IRQ - Interrupt Request
ISA - Industry Standard Architecture
ISO - International Standards Organization

--- J ---
JBL - JBL (Jame B. Lansing) Speakers
JVC - JVC Company of America

- K ---
Kbps - Kilobits Per Second
KBps - KiloBytes per second

--- L ---
LG - LG Electronics
LAN - Local Area Network
LCD - Liquid Crystal Display
LDT - Lightning Data Transport
LED - Light Emitting Diode

--- M ---
MAC - Media Access Control
MB � MotherBoard or Megabyte
MBps - Megabytes Per Second
Mbps - Megabits Per Second or Megabits Per Second
MHz - MegaHertz
MIPS - Million Instructions Per Second
MMX - Multi-Media Extensions
MSI - Micro Star International

--- N ---
NAS - Network Attached Storage
NAT - Network Address Translation
NEC - NEC Corporation
NIC - Network Interface Card

--- O ---
OC - Overclock (Over Clock)
OCZ - OCZ Technology
OEM - Original Equipment Manufacturer

--- P ---
PC - Personal Computer
PCB - Printed Circuit Board
PCI - Peripheral Component Interconnect
PDA - Personal Digital Assistant
PCMCIA - Peripheral Component Microchannel Interconnect Architecture
PGA - Professional Graphics Array
PLD - Programmable Logic Device
PM - Private Message / Private Messaging
PnP - Plug 'n Play
PNY - PNY Technology
POST - Power On Self Test
PPPoA - Point-to-Point Protocol over ATM
PPPoE - Point-to-Point Protocol over Ethernet
PQI - PQI Corporation
PSU - Power Supply Unit

--- R ---
RAID - Redundant Array of Inexpensive Disks
RAM - Random Access Memory
RAMDAC - Random Access Memory Digital Analog Convertor
RDRAM - Rambus Dynamic Random Access Memory
ROM - Read Only Memory
RPM - Revolutions Per Minute

--- S ---
SASID - Self-scanned Amorphous Silicon Integrated Display
SCA - SCSI Configured Automatically
SCSI - Small Computer System Interface
SDRAM - Synchronous Dynamic Random Access Memory
SECC - Single Edge Contact Connector
SODIMM - Small Outline Dual Inline Memory Module
SPARC - Scalable Processor ArChitecture
SOHO - Small Office Home Office
SRAM - Static Random Access Memory
SSE - Streaming SIMD Extensions
SVGA - Super Video Graphics Array
S/PDIF - Sony/Philips Digital Interface

--- T ---
TB - Terabytes
TBps - Terabytes per second
Tbps - Terabits per second
TDK - TDK Electronics
TEC - Thermoelectric Cooler
TPC - TipidPC
TWAIN - Technology Without An Important Name

--- U ---
UART - Universal Asynchronous Receiver/Transmitter
USB - Universal Serial Bus
UTP - Unshieled Twisted Pair

--- V ---
VCD - Video CD
VPN - Virtual Private Network

--- W ---
WAN - Wide Area Network
WTB - Want to Buy
WYSIWYG - What You See Is What You Get

--- X ---
XGA - Extended Graphics Array
XFX - XFX Graphics, a Division of Pine
XMS - Extended Memory Specification
XT - Extended Technology
Boot windows faster

Do you want your computer to start up faster? Are you feeling that it takes foreever for your computer to start up? Then follow the steps here and make your computer to boot up faster than ever.

1. Open notepad.exe, type "del c:\windows\prefetch\ntosboot-*.* /q" (without the quotes) & save as "ntosboot.bat" in c:\

2. From the Start menu, select "Run..." & type "gpedit.msc".

3. Double click "Windows Settings" under "Computer Configuration" and double click again on "Shutdown" in the right window.

4. In the new window, click "add", "Browse", locate your "ntosboot.bat" file & click "Open".

5. Click "OK", "Apply" & "OK" once again to exit.

6. From the Start menu, select "Run..." & type "devmgmt.msc".

7. Double click on "IDE ATA/ATAPI controllers"

8. Right click on "Primary IDE Channel" and select "Properties".

9. Select the "Advanced Settings" tab then on the device or 1 that doesn't have 'device type' greyed out select
'none' instead of 'autodetect' & click "OK".

10. Right click on "Secondary IDE channel", select "Properties" and repeat step 9.

11. Reboot your computer.

Note: I recommend doing this only if you feel comfortable doing this or can do exactly what is written here. A single mistake can damage your computer to a great extent. So, this is just for educational purpose and you are responsible in changes to your computer.

Hidden applications in Windows...

This article is especially based on windows XP. But is also very helpful for other version of windows like vista and 7.

HERE ARE THE LIST OF SOME WINDOWS HIDDEN APPS:
=========================================
To run any of these apps go to Start > Run( OR Win key + R) and type the executable name (ie charmap).

1) Character Map = charmap.exe (very useful for finding unusual characters)

2) Disk Cleanup = cleanmgr.exe

3) Clipboard Viewer = clipbrd.exe (views contents of Windows clipboard)

4) Dr Watson = drwtsn32.exe (Troubleshooting tool)

5) DirectX diagnosis = dxdiag.exe (Diagnose & test DirectX, video & sound cards)

6) Private character editor = eudcedit.exe (allows creation or modification of characters)

7) IExpress Wizard = iexpress.exe (Create self-extracting / self-installing package)

8) Microsoft Synchronization Manager = mobsync.exe (appears to allow synchronization of files on the network for when working offline. Apparently undocumented).

9) Windows Media Player 5.1 = mplay32.exe (Retro version of Media Player, very basic).

10) ODBC Data Source Administrator = odbcad32.exe (something to do with databases)

11) Object Packager = packager.exe (to do with packaging objects for insertion in files, appears to have comprehensive help files).

12) System Monitor = perfmon.exe (very useful, highly configurable tool, tells you everything you ever wanted to know about any aspect of PC performance, for uber-geeks only )

13) Program Manager = progman.exe (Legacy Windows 3.x desktop shell).

14) Remote Access phone book = rasphone.exe (documentation is virtually non-existant).

15) Registry Editor = regedt32.exe [also regedit.exe] (for hacking the Windows Registry).

16) Network shared folder wizard = shrpubw.exe (creates shared folders on network).

17) File siganture verification tool = sigverif.exe

18) Volume Contro = sndvol32.exe (I've included this for those people that lose it from the System Notification area).

19) System Configuration Editor = sysedit.exe (modify System.ini & Win.ini just like in Win98! ).

20) Syskey = syskey.exe (Secures XP Account database - use with care, it's virtually undocumented but it appears to encrypt all passwords, I'm not sure of the full implications).

21) Microsoft Telnet Client = telnet.exe

22) Driver Verifier Manager = verifier.exe (seems to be a utility for monitoring the actions of drivers, might be useful for people having driver problems. Undocumented).

23) Windows for Workgroups Chat = winchat.exe (appears to be an old NT utility to allow chat sessions over a LAN, help files available).

24) System configuration = msconfig.exe (can use to control starup programs)

25) gpedit.msc used to manage group policies, and permissions

Note: Few of the applications above are only for the expert users. If you are not sure what you are doing in those application I recommend not to use them. But if you need to learn how to use them then contact me.

Want to speed up the internet browsing speed???

Microsoft Windows: Speed Up Your Network and Internet Access...


IMPORTANT!!! I recommend you doing this only if you are comfortable in doing this. Sometimes if you do even a simple mistake in something, then you might have a bigggg problem. So, if you want to do it but need more proper guidance on what you are actually doing, just to make sure then I strongly recommend you to contact me via email. My email is on the right side of this blog page. So, feel free to contact me... I increased my internet speed by more than 50% by following the things I have written here. So, it is really working and really helpful!!!


Does your computer slow down when you browse your local area network and connect to other computers that are sharing data? One of the most common causes of this slowdown is a feature of Windows Explorer that looks for scheduled tasks on remote computers. This effort can take some time on some computers and can really slow down your browsing. The window with which you are browsing the network may appear to freeze momentarily, as the system is waiting for a response from the remote computer.


Windows XP: Speeding Disk Access

Although this problem is a complex one, the solution is very simple. Instead of having to wait for the remote scheduled tasks, which is useless information to anyone who is not a system administrator remotely configuring scheduled tasks, you can disable this feature.

In order to do this, you will have to change the System Registry and delete a reference to a key so that this feature will not be loaded. To do this, follow these steps:

1. Open up the Registry Editor by clicking the Start Menu and selecting Run. Then type regedit in the text box and click the OK button.

2. Once the Registry Editor has loaded, expand the HKEY_LOCAL_MACHINE key.

3. Next, expand Software and then Microsoft.

4. Locate Windows and expand that as well.

5. You will want to be editing the main system files, so expand CurrentVersion.

6. Because this feature is a feature of the Windows component known as Explorer, expand the Explorer key.

7. Next, you will want to modify the remote computer settings, so expand the RemoteComputer key and then expand the NameSpace key to show all of the features that are enabled when you browse to a remote computer.

8. In the NameSpace folder you will find two entries. One is "{2227A280-3AEA-1069-A2DE-08002B30309D}" which tells Explorer to show printers shared on the remote machine. The other, "{D6277990-4C6A-11CF-8D87-00AA0060F5BF}," tells Explorer to show remote scheduled tasks. This is the one that you should delete. This can be done by right-clicking the name of the key and selecting Delete.

Tip:
If you have no use for viewing remote shared printers and are really only interested in shared files, consider deleting the printers key, "{2227A280-3AEA-1069-A2DE-08002B30309D}", as well. This will also boost your browsing speed.

Once you have deleted the key, you just need to restart and the changes will be in effect. Now your network computer browsing will be without needless delays.